Thursday, March 10, 2011

Windows 7 SP1 Introduces Breaking Changes to MDAC

Wow, this one really took our office by surprise. A few of us here have updated to Windows 7 SP1. Some of the developers are also charged with maintaining some legacy VB6 applications that used ADODB to work with MS SQL Server databases.

If you compile this legacy code on Win7SP1, it will work *only* on Win7SP1 - any down stream OS versions will get some bad-juju runtime errors.

The issue is discussed in length at http://social.msdn.microsoft.com/Forums/en/windowsgeneraldevelopmentissues/thread/3a4ce946-effa-4f77-98a6-34f11c6b5a13

In short, it sounds like they made some changes to MDAC to make it play more friendly with x64 compilations, but in the process busted it for all older OSes. There's some work-arounds being discussed in the above post, but they have catches, like, if you update your legacy code (not that that's always a possibility,) you loose the ability to compile that code on non-Win7SP1 machines.  The only surefire fix right now to not compile your legacy code on Win7SP1 - uninstall SP1 for now until an update is released.

Useful tidbits I gleaned:

Update 2011-Apr-13: 

Thursday, December 11, 2008

Delayed Event Handlers and System.Threading.SynchronizationContext

I've found myself in situations where I'm on the receiving end of an API that for whatever reason will raise events in (relative) rapid succession.  It just so happens that I need to execute some code when that event is raised, but not with every event raise. 

For example, imagine you have a graphical mapping API.  Suppose that when the user pans the map, a "Panned" event is raised.  It turns out to be quite common that a user will pan the map over and over before they finish panning. The processing I need to perform on that Panned  event isn't terribly intensive, but it's not without cost; a cost that is too expensive to incur on every Panned event, to say nothing of the worthlessness of performing this processing before user has finished panning. 

A simple answer to that is some form of delayed event processing.  Due to different circumstances at different times I've found myself using two different types of delayed event handlers:

  1. Once the event is raised, it waits for a period of time, and then executes.
  2. Once the event is raised, it waits for a period of time to elapse in which no more of the events have been raised.

The first one is analogous to a timed-delay on a camera, or System.Windows.Forms.Timer, or System.Thread.Timer.  The second is more of "I'll wait for you to finish talking before I start talking" kind of thing. Basic implementation entails firing off an asynchronous method that performs the appropriate type of waiting, and once it's finished, the actual processing takes place. 

Before getting into the details of this implementation, let's talk about UI-thread synchronization.  If you've ever taken advantage of some thready goodness in order to fork off work, then you may have found out that you are not able to update the UI from the non-UI/main thread.  If you try to touch the UI thread, the Framework will throw an InvalidOperationException telling you: "Cross-thread operation not valid: Control 'TheTextBox' accessed from a thread other than the thread it was created on." If you've run into this, you've probably googled-up just a few pages about this exception, and as such, I will not rehash the details here. In short, ISynchronizeInvoke is your answer.  Lucky for almost all cases, System.Windows.Forms.Control implements ISynchronizeInvoke. It's common enough that in some of my code you'll see a "DoOnUIThread" method that I use in my non-UI-threaded code.  It's pretty simple, take a look:

private void DoOnUIThread(System.Threading.ThreadStart method) {
   if (this.InvokeRequired) { 
      this.Invoke(method, null);
   } else {
      method();
   }
}

Where "this" is a Control-derived control, such as a System.Windows.Forms.Form. It's pretty easy to modify this to match whatever delegate you need, and I can only assume there's a simple generic implementation that could accept any delegate type, I just haven't done that yet.  It's easy enough to use:

DoOnUIThread(delegate() {
   // My UI-bound code goes here, for example:
   _TextBox.Text = "Hello There.";
});


Unfortunately, there are cases where you're writing something that doesn't have access to a Control-based object.  For example, imagine you're implementing a class library that needs to do threaded operations.  In your unit tests everything seems to run great - your business objects instantiate, thread, calculate and populate.  But unless you also include tests that bind those objects to the UI, you may miss that you can easily get the "Cross-thread operation not valid:" InvalidOperationException only when you bind your business object to the UI. These situations are usually easily remedies by making your objects require an ISynchronizeInvoke object upon instantiation.  That ISynchronieInvoke object can be used to use a DoOnUIThread style method to make sure you don't run into that Cross-thread exception.

Even more unfortunate, there are cases where maybe your business objects are so entrenched, or it's simply impractical to require an ISynchronizeInvoke object to be specified upon instantiation. In these cases you're really at a loss for what to do when you need to do some work on a different thread that will eventually need to touch the UI thread.  If you can safely make the assumption that the object will normally be executing in the scope of the UI thread, then you can get your worker-threads back into the context of the UI thread by using System.Threading.SynchronizationContext.  If you make sure to grab a hold System.Threading.SychronizationContext.Current before forking off your worker thread, the worker thread will be able to get back to the UI thread to execute any UI-bound code.

Now let's look at an example of this in my implementation of a simple "timer" delayed event handler:

private System.Threading.ThreadStart _Click_DelayedEventHandler;
private System.Threading.SynchronizationContext _SynchronizationContext;
private void button1_Click(object sender, EventArgs e) {
   if (_Click_DelayedEventHandler != null) {
      return;// we're already waiting - bail out
   } else {
      // setup the 'wait until finished' anonymous method:
      _Click_DelayedEventHandler = delegate() {
         System.Threading.Thread.Sleep(1000);
      };
      AsyncCallback finishedWaiting = delegate(IAsyncResult ar) {
         // Take note that at this point you will still be executing on a threadpool thread,
         // not on the UI thread.
         SendOrPostCallback hello = delegate(object state) {
            MessageBox.Show(this, "Hello World", "Caption", MessageBoxButtons.OK, MessageBoxIcon.Exclamation);
         };
         _SynchronizationContext.Post(hello, null);

         // Make SURE to cleanup or this will be a one-trick pony
         _Click_DelayedEventHandler = null;
         _SynchronizationContext = null; // don't strictly need to set this to null...
      };

      // fire off our anonymous 'waiter' method on a thread-pool thread:
      _SynchronizationContext = SynchronizationContext.Current;
      _Click_DelayedEventHandler.BeginInvoke(finishedWaiting, null);
   }
}

To try this out, you should be able to create a new Windows Forms project, place a button on the form, hook up this method as the Click event handler. When you run, you should be able to click the button, and no matter how many times you click, you'll only get the "Hello World" message box after one second has elapsed since your first button click. So, what happens is, on the first click, it sets up a ThreadStart delegate, and executes it.  The only thing this does is wait for one second.  If any more button-clicks come in during this second, they're ignored. After the second, the ThreadStart finishes, and the 'finished' callback executes.  It's in this anonymous method that we place our real work.  In the finishedWaiting you can see the use of the UI SynchronizationContext - you create a SendOrPostCallback delegate and .Post it to the UI SynchronizationContext. At the end of finishedWaiting is very important cleanup code.  If you don't set the _Click_DelayedEventHandler back to null, this whole thing is just a one-trick pony.


Here's the more-useful "I'll wait for you to stop clicking" delayed event handler:

private System.Threading.ThreadStart _ButtonClick_DelayedEventHandler;
private DateTime _ButtonClick_LastChangeTime;
private object _ButtonClick_LastChangeLock = new object();
private System.Threading.SynchronizationContext _ButtonClick_SynchronizationContext;
private void button1_Click(object sender, EventArgs e) {
   if (_ButtonClick_DelayedEventHandler != null) {
      // we're already waiting...increment the 'last fired' indicator.
      lock (_ButtonClick_LastChangeLock) { _ButtonClick_LastChangeTime = DateTime.UtcNow; }
   } else {
      // setup the 'wait until finished' anonymous method:
      _ButtonClick_DelayedEventHandler = delegate() {
         // this will loop indefinately until the event hasn't been
         // raised for at least 1 second
         TimeSpan difference = TimeSpan.Zero;
         do {
            System.Threading.Thread.Sleep(100);

            DateTime lastChanged;
            lock (_ButtonClick_LastChangeLock) { lastChanged = _ButtonClick_LastChangeTime; }
            difference = DateTime.UtcNow.Subtract(lastChanged);
         } while (difference.TotalMilliseconds < 1000);
      };
      AsyncCallback finishedWaiting = delegate(IAsyncResult ar) {
         SendOrPostCallback hello = delegate(object state) {
            MessageBox.Show(this, "Hello World", "Caption", MessageBoxButtons.OK, MessageBoxIcon.Exclamation);
         };
         _ButtonClick_SynchronizationContext.Post(hello, null);


         // Make SURE to cleanup or this will be a one-trick pony.
         _ButtonClick_LastChangeTime = DateTime.MinValue;
         _ButtonClick_DelayedEventHandler = null;
         _ButtonClick_SynchronizationContext = null;
      };


      // fire off our anonymous 'waiter' method on a thread-pool thread:
      _ButtonClick_SynchronizationContext = SynchronizationContext.Current; // assumed to be the UI thread
      _ButtonClick_LastChangeTime = DateTime.UtcNow;
      _ButtonClick_DelayedEventHandler.BeginInvoke(finishedWaiting, null);
   }
}


To try this out, do the same steps as the first delayed event handler - hook this up to a button-click.  The difference you'll notice is that as long as you keep clicking the button at least once every second, the message box will not pop up.  It waits for you to finish hammering the button.  Again, it's very important that you cleanup at the end of finishedWaiting, and note that there is more to cleanup this time.

Anyway, feel free to customize to your needs, and I really hope these are useful to someone other than myself.

Thursday, October 16, 2008

Quick Highlighter - Quick and Easy HTML/CSS Code Highlightin

Hey everyone, just a quick post.  I recently learned about Quick Highlighter. It will take just about any piece of code you can throw at it and spit out snazzy HTML/CSS syntax highlighter code.  I just used it in my previous post. It's great.

I've used the CopySourceAsHtml AddIn for Visual Studio 2003/2005/2008, but I've always disliked it because my color scheme in Visual Studio doesn't translate well to HTML.  My blog has a dark-text-on-light-background scheme while I code in a light-text-on-dark-background scheme.  Plus, it doesn't help me when I want to post a piece of VB6 code, or code in any other language for that matter.

So, give it a try.  I like it. :)

Troubles Marshalling System.Guid to Visual Basic 6.0 (VB6)

I find myself in the <finger-quote>interesting</finger-quote> situation of having to interop a large portion of .NET code back into an older VB6 code base. As it turns out, I need to pass a System.Guid to VB6. Before exposing a property that returned a System.Guid I made sure that System.Guid was COM-Visible - it is:

[Serializable]
[ComVisible(true)]
public struct Guid : IFormattable, IComparable, IComparable<Guid>, IEquatable<Guid> {
   // remainder of metadata snipped for brevity
}

But let's get this point across right from the beginning: System.Guid is marked as being COM-Visible, but it is not usable in VB6! After adding a reference to mscorlib, VB6 will allow you to create a variable of type System.Guid:

Dim myGuid as mscorlib.Guid 

But you are unable to actually make use of 'myGuid' variable.  There is no intellisense pop-up when you type 'myGuid.', there's no way to create one or populate a declared mscorlib.Guid

I'm not entirely sure what the problem is, but I have to assume it has to do with Guid being a struct. Regardless of the reason for the problem, I still needed access to a System.Guid in VB6. Thankfully, all my problem requires is to fetch the Guid from a .NET object, and then pass that Guid to a stored procedure that's expecting a SQL Server "uniqueidentifier" data type.

I started searching. Talk about a tough problem to google for!  There's a lot of really good hits regarding Guid's an creating COM-visible classes/interfaces, but I found very little info on actually marshalling a System.Guid back-n-forth to/from .NET. Thankfully, I was able to find this post where someone is experiencing the exact same problem.  Unfortunately, there was no good answer. Someone did post a reply which didn't answer the original poster's question, but does include a link to an Adam Nathan blog post discussing customizing marshalling, which uses a System.Guid as an example. It's informative, but it doesn't offer any assistance with the problem.

For verbosity (and the morbidly curious,) let's look at a simple example illustrating the problem.  Here's an interface and a class that implements that interface, all exposed to COM. (This is in C#, but can just as easily be written in VB.NET.)

[Guid("BD95337B-0395-4773-B2FC-2BC812388BAB")]
[InterfaceType(ComInterfaceType.InterfaceIsIDispatch)]
[ComVisible(true)]
public interface IGuidGetter {
   Guid GetSessionID();
}
 
[Guid("6AAFF9A3-875D-4955-AE09-634A88D9EC56")]
[ClassInterface(ClassInterfaceType.None)]
[ComVisible(true)]
[ProgId("JTPApp.GuidGetter")]
public class GuidGetter : IGuidGetter {
   public Guid GetSessionID() {
      return Guid.NewGuid();
   }
}

To use that class in VB6, we compile it, regasm it, and add the registered type lib as a reference to the VB6 project. We can now do something like:

Dim myGuidGetter As New GuidGetter
Dim myGuid As mscorlib.Guid

myGuid = guidGetter.GetSessionID()

Unfortunately, Line 4 will fail to compile, giving you a "Variable uses an automation type not supported in Visual Basic" error message.


Decorating the .NET interface and/or implementation with [MarshalAs(UnmanagedType.LPStruct)], while it does change the COM IDL (as noted and demonstrated in Adam Nathan's article,) doesn't make any difference from a VB6 standpoint. You always get the "Variable uses an automation type not supported in Visual Basic" error.


The really aggravating part for me is that I don't need to really use the Guid in VB6.  I simply need VB6 to retrieve it, and then stuff it into a stored procedure call! 

With this in mind, I tried returning the Guid as an object, but figured it would have problems because I would be boxing a value type in a reference type and then expecting VB6 to know how to properly unbox it. VB6 was able to retrieve the Guid into a Variant, but upon trying to set it as a parameter to the stored procedure, I received an AccessViolationException in my .NET code. Not pretty.

Thankfully, my work-around to the problem turns out to be pretty simple: Return the Guid as a string.  So, to follow through with the example code I started above, if you change it to look like:

[Guid("BD95337B-0395-4773-B2FC-2BC812388BAB")]  
[InterfaceType(ComInterfaceType.InterfaceIsIDispatch)]  
[ComVisible(true)]  
public interface IGuidGetter {  
   string GetSessionID();  
}  
 
[Guid("6AAFF9A3-875D-4955-AE09-634A88D9EC56")]  
[ClassInterface(ClassInterfaceType.None)]  
[ComVisible(true)]  
[ProgId("JTPApp.GuidGetter")]  
public class GuidGetter : IGuidGetter {  
   public string GetSessionID() {  
      return Guid.NewGuid.ToString();  
   }  
} 

It will work.  You get the Guid, as a string, in VB6.  There's only one minor catch to getting SQL Server to be able to convert that string into a unique identifier, it must be enclosed in curly braces, like so:

  1. Dim sqlCommand As New ADODB.Command
  2. With sqlCommand
  3.    .ActiveConnection = dbConn
  4.    .CommandText = "A_Stored_Procedure"
  5.    .CommandType = adCmdStoredProc
  6.    .Parameters.Refresh
  7.           
  8.    Dim tmp As String
  9.    tmp = g_UserInfo.GetSessionID()
  10.    .Parameters("@sessionID").Value = "{" & tmp & "}"
  11.           
  12.    .Execute , , adExecuteNoRecords
  13. End With
  14. Set sqlCommand = Nothing

On line 10, you can see that I wrapped it in curly-braces.  So while this works for my scenario, there's no way, that I've figured out, to easily interop a System.Guid value back and forth between .NET and VB6.

Anybody have useful insight in how to get the back-n-forth marshalling to work?  I can't imagine I'm the only one who's ever needed to do this.

Sunday, July 20, 2008

Panographic Play using Autostitch

I've been playing with Autostitch for a while now. It's a proprietary, but free, tool for automatically stitching and blending photographs together into panographic mosaics.

For any of these pictures, click them and go download the original to see the full-size stitch.

Here's a link to the entire album:
Stitched Panographic Photos


Here's a few from the album:

This is the bridge over the Eagle River in Eagle River. Any family members recognize this stitch from the family blog? This is the raw stitch before cropping and editing.


Here's a shot from Winter Carnival 2008. This is the delt-sigs statue. Again, download the original full-size image and check out the detail. :) (This could use some contrast-adjusting...)


This is the lower Hungaria falls. This was a simple three-photo stitch. I had to rotate the pictures 90 degrees before stitching.


This is the spring 2008 run-off on the Tioga River in between Houghton and Marquette at a roadside park. It's just outside of Alberta by a few miles. I had photos to go in the bottom left of the photo, but autostitch didn't include them in the stitch for whatever reason.


This is another of the Tioga river.

There's more in the album, so click-through to see them all.

Tuesday, May 20, 2008

XPS Documents Opening With Firefox in Vista

So there I was, I had completed a transaction at a 'save this page for your records' page that I wanted to a PDF. Ooops...I don't have Acrobat on this laptop. Luckily I knew I had the XPS 'printer' installed by default. (It comes with Vista.)

So I print it to an .xps file. it appears to 'print' successfully. The problem is, when I doublt-click it to open it, it opens in Firefox! Firefox is set as my default browser, but I find this weird - I thought there was an XPS viewer application. I right-click the .xps file and choose "Open With" and then "XPS Viewer". Again, it tries to open in Firefox. Firefox doesn't understand the .xps extension and offers to save the file for me, or let's me open it with "XPSViewer.Document (default)". Huh. Ok. I tell Firefox to open it with the "XPSViewer.Document (default)". Firefox opens yet another tab with the .xps document, offering again to save/open it for me.


Okaaaaay.

I caught wind that you should try dropping the file into Internet Explorer. This works. IE recognizes the file and opens the XPS document for you. I also caught wind that this isn't just a Firefox problem, but rather a "default browser is not IE" problem. One solution to the problem is to re-associate the .xps file extension with IE instead of the "XPS Viewer" application. The other route (which I prefer) is to download the "XPS Essentials" pack from Microsoft. I think this pack was originally intended to add XPS functionality to XP and Server 2003, but it now supports Vista, and it appears to merge into Vista as some sort of update.

After I installed this update, double-clicking an .xps file still opened it in Firefox though! Come on! If I right-click on the .xps file, and choose "Open With", I now have a new item: "XPS Viewer EP". Ah-ha! This opens up the .xps file in it's own separate non-browser viewer. Perfect!

All that's left to do is make XPS Viewer EP the default app for .xps files. The first time I tried changing a file extension association in Vista, I went about it the way you do in XP - go to the Tools->Folder Options menu. But in Vista, the dialog that get for Folder Options doesn't have the familiar file associations tab that XP has. In Vista, you have to use the "Default Programs" Start menu item. (Just use the quick-search, or you should be able to find it under the Control Panel:


Just hit the ''Associate a file type or protocol with a program" item and you should be able to figure it out from there.

Friday, April 11, 2008

AnkhSVN and VS2008

I found this post by Damien Guard useful on getting AnkhSVN to work with VS2008.

Sorry for such a short post...

Wednesday, April 02, 2008

Rolling Back An SVN Repository

Yeesh...  Talk about a minor panic.

Don't ask me how, because I'm not entirely sure what I did to make it happen.  But, I thought I went to commit some code, and when I hit 'commit', instead of committing the code, it decided that I had flagged my entire working directory and the point in the repository for deletion. 

I really don't know what happened.

I thought I'd fix the problem by simply pulling out my stuff at a previous revision, and recommitting. This seemed problematic because I'd have to re-add the trunk, and there would still be a delete in the history, and I'm sure that could cause merge-hell in the future. 

Some quick googling turned up Tim Hatch's very simple instructions on how to rollback an SVN commit. Tim apparently accidentally checked some confidential information into his public repository and explains how to rollback a revision by doing something really dirty: manually modifying your repository.

I won't rehash what he explains, but know that his solution worked for our FSFS based repository.


Thanks Tim!

Tuesday, March 11, 2008

Tumblr

For the three of you who read my blog, and the two of you who subscribe to this blog's RSS feed, I'm here to say you may want to also sub to my tumblr feed.

Actually, you may want to sub to that and unsub from this because the tumblr feed aggregates this blog feed. It's up to you I guess.

Why tumblr? Because I'm not cool enough for twitter, and honestly, I like the extra content-type features tumblr offers. My primary reason for creating a tumblr account is because I have my Google Reader Shared Items feed, (shown at right, and also aggregated by my tumblr feed,) but I've ran into a lot of things that aren't on a feed and thusly can't be easily 'shared'.

So, that's yoopergeek.tumblr.com, and it's RSS feed.

A little extra EVDO info

In my last post about my new-found broadband, I should have linked EVDOInfo.com Specifically, their "What is EVDO?" page.

Sunday, March 09, 2008

Current Reading

Over a year ago, I subscribed to MAKE Magazine after following the MAKE RSS feed for probably 6 months before that. I loved the magazine, but felt slightly left out of many of the projects being covered.

See, while I have a lot of software development background, I have very little electronics background. I did grow up playing with those "100-in-1 Electronics Projects" kits but electronics never really took off in my mind.

I've taken a couple (pathetic) stabs at it in the past, but I always lost interest when I couldn't find any good introductory reading material. The things I would read seemed so far detached form the level that I wanted to be involved with. (Does that makes sense?) I knew I had to learn about the low-level concepts such as electromotive force, current, power, and how they relate to each other, but everything I tried reading just didn't seem to hit the right 'buttons' in my head to click.

After watching the AVR Episode of Systm, I thought "holy crap, I can do that, and these AVR microprocessors? They seem right up my alley!" I don't know what it was, but there was something about that episode that made electronics, at least simple microprocessor-based electronics, feel accessible to me: Wire up a simple chip-programmer. Write some code. Compile some code. Push code to chip. Blinky LED!!

I really think it had to do with the simplicity of the programmer, and the hold-your-hands instructions they linked to that grabbed me and said: "You're gonna learn another hobby, buck-o."

I played a bit on a breadboard, never actually making that AVR programmer (yet). I again thought: "Yeah...this is cool...but I still need a good book." I dug around for a while, and of course, there's a ton of books on "learning electronics"...kinda makes picking one a tough choice.

Luckily, while on Amazon I was reading a scathing review for some book that I don't remember. The reviewer mentioned "Gibilisco's book", and how great it was for the total newbie. "Not too in depth, not too light." The freakin' just-right porridge of the 'learning-electronics' book world is what it sounded like!

I searched, found, and purchased Gibilisco's book and have been reading it (slowly) for over a week now, and I have to agree with that reviewers sentiment: So far, this book is good for beginners. I like that it's easy to read and understand, and at the end of every chapter, there's a test. It feels like a book from school in some ways...but without that $250 price tag.


I'll probably write more about this as the time goes on. But from what I've read so far of this book, I like it, and I'd recommend it to any 'geeky' individual who just hasn't found the right reading material to get them into electronics.

Motorola ROKR (MOTOROKR Z6m) + Alltel EVDO == "Finally, broadband in my home!"

My family and I live in one of the few remaining middle-of-nowheres. There's plenty of nice things about our middle-o-nowhere: it's cozy, it has just about everything you need and it's surrounded by pretty much nothing but beautiful sites for at least 100 miles. Heck, it even has bandwidth options out the wa-zoo: cable, DSL, and even line-of-sight wireless DSL. Naturally, we bought a house that's just far enough out of town to not have access to any of these options.

"But I work in front of a computer all day...surely I don't need/want broadband at home?" Yeah...I kept telling myself that for the last 8 years. The winters are just too long around here to not have broadband. Of course, I've always had the satellite option, but it just wasn't for me -- large initial setup costs, and then hefty monthly fees, mixed with latency issues.

Thankfully, finally, as I sit here and type this, I'm on something other than dialup, and man, I gotta say, Alltel has got a decent thing going right now. I wish I could say I'm being paid for this free advertising, but I'm not. I'm just thrilled to the core to have bandwidth!

I recently got a new cell phone, the Motorola ROKR Z6m. I won't go into the snazzy details of the phone -- click that link if you want details.

We've had an Alltel contract for nearly two years now. A while back, as I drove home from work, I noticed the Alltel store had a banner outside proclaiming "$25 HIGH SPEED INTERNET FOR YOUR PC!" Huh. I eventually got around to checking it out. It's just that. $25/month, for, as far as I can tell, truly unlimited data transfer. I've heard it called 'tethered' internet because you have to hook your phone to you computer via USB (or possibly bluetooth...) Anyway, it's nice in that it's not a contracted service - you can turn add/remove it from your plan whenever you want.

Now, if you're reading this and you don't have broadband, and you're considering going with this Alltel-route, maybe I can save you some money and trouble. Visit the alltel page for some brief details. Scroll all the way to the bottom and you'll see the "Wireless Internet Kit" which strangely, includes a cable. All this kit has are cable(s) for hooking your phone to your PC's USB port, and some software/drivers on a CD.

If you have a phone that has a USB connection on it, just pick up the most affordable USB cable you can find. If not, well, you may want to spring for the $60 kit...or maybe splurge and upgrade to a new phone? Make sure it's an EVDO phone! For the software, all you need are the USB drivers. You can download these drivers directly from Motorola (free registration required to download.) After downloading and installing the drivers, but before hooking your phone to your PC, make sure your phone is set to work as a modem when hooked up via USB, this should be buried under the "Connection" settings. Now hook your phone to your PC.

Assuming you have your internet plan turned on, your phone has signal, your drivers are 'happy' with the phone, all you need to do to get connected is to setup a new dialup internet connection in Windows (sorry, I'm not a Mac guy, and I've not the desire to make this work under *nix.) The number you need to dial will be "#777". For username and password, use "[YourPhoneNumber]@alltel.net", ie: 1235551212@alltel.net. The password should be "alltel".

Dialup and you should be connected!

Check me out! It's not amazing, but you must admit it's a ton better than dialup. :)


PS: I've left out some details here as it's getting late, but big thanks to Mikie and mom for helping get my contract squared away, and thank you interpipes for offering up the answers as you always do. ;)

Wednesday, November 14, 2007

Cloaking/Hiding/Filtering Unwanted Directories During Checkout (aka "Partial Checkouts") With Subversion 1.4.x

The Problem:

Ever find yourself working with a large-ish SVN repository that includes many sub-projects, and you only want to work on a subset of those sub-projects, but you don't want to deal with all the extra cruft involved in checking out at the top level of the repository?

"What's this guy talking about?"

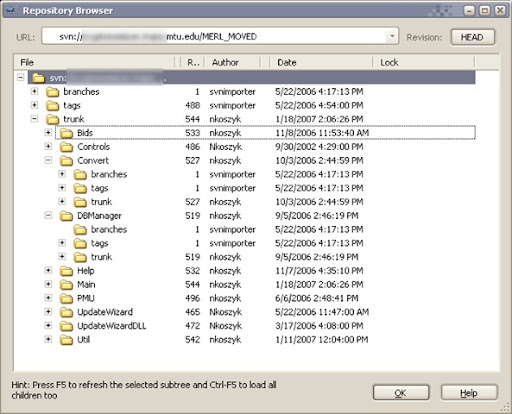
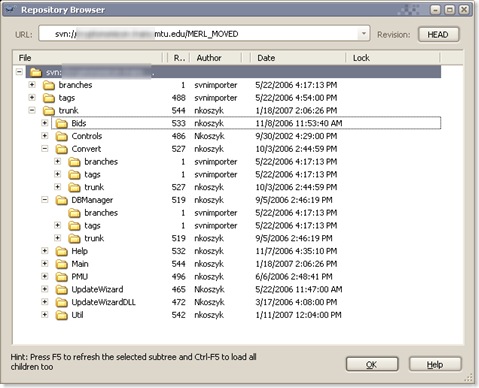
Sorry, a picture will help me explain.  Below is a snapshot of an old repository of one of products we develop here at work:
00_source_repo_browse

As you can see, trunk consists of multiple sub-components, each of which have their own branches/tags/trunk folders.  Whether or not this is the best repository layout could be up for debate, but it seems to treat us well with the design of this project. (We have a repository layout similar to this for another project we have, and it seems to serve us well there as well.)

The big problem we have with this repository layout is that you never want to checkout that top-level trunk.  You end up with all of the sub-branches and tags folders that are not only superfluous, but also waste space and make the commit or update process so much slower because SVN must check all the sub-folders for modifications.

What ends up happening, for example, is someone needs to work on the "Bids" and "Main" components at the same time.  To facilitate this without checking out at the trunk-level is they create two separate working folders, and check out each respective component's trunk (or appropriate branch).  When they commit, they have to make two separate commits.

While this works, it's not desirable, especially if you aspire to reach Continuous Integration nirvana. Not being able to create an atomic commit across various working folders could potentially break things in a CI environment if changes in one component rely upon the changes of another.  Even if CI isn't your eventual goal, an atomic commit of 'grouped changes' just makes sense.

"What to do?" 

The Fix:

Well, the good news is that Subversion 1.5 is supposed to have better support for 'partial checkouts'.  I'll admit I haven't kept up with that aspect of v1.5, to be totally honest, I'm more excited about merge tracking. But that's for another post.

But anyway, there is a work-around in SVN 1.4.x (and probably earlier versions..sorry for not doing any fact-checking here.)  Well, maybe work-around isn't the right word, it's more of an off-label use of a repository feature.

Before continuing on, you must know that I'm primarily a Windows developer.  I use Subversion on Windows via the excellent TortoiseSVN front end. The following how-to is going to be using TortoiseSVN.  Everything that follows is entirely possible with the command line SVN tools, and, if there's enough request, I'll update this post with how to do it from the command line. (email me!)

"Get to it already, would ya?"

Sorry, here we go, in short:

  1. Create a repository on your local machine.
  2. Checkout a working copy of the repository and specify an svn:external property that will link to the portions of the remote repository you really want to work with. (Read the SVN Book for important notes and details.)
  3. Commit this svn:externals property back to the local repository.
  4. Update you working copy of the local repository and you'll have checked out the parts of the remote repository you want to work with.

Details:

Create a new folder somewhere on your machine, make sure it's in a place that you won't forget, and in non-obtrusive location because once this is created, it can't be moved without causing you pain in the process. ;)

01_myfilterrepo

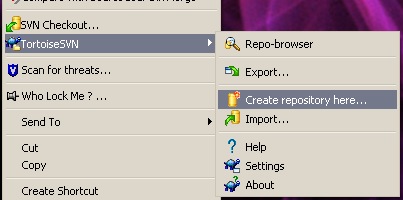
MyFilterRepo is a folder on my desktop.  Now, using TortoiseSVN, create an empty repository inside that new folder.  Right click on the folder, choose  TortoiseSVN -> Create repository here...  Choose the 'FSFS' file system type.
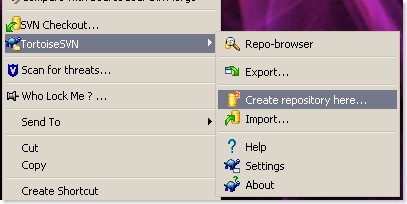
02_create_repo 

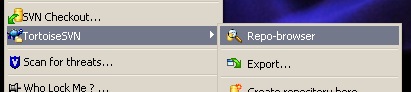
Then, browse this repository, right-click the folder, TortoiseSVN->Repo-browser:
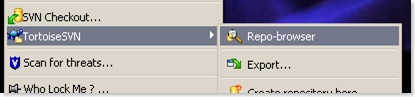
03_repo_browse

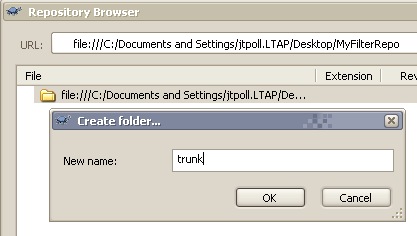
Create a 'trunk' folder (or any other folder...it doesn't really matter:)
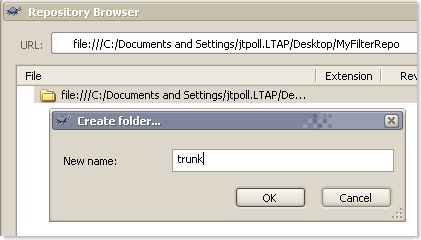
04_create_trunk

Create another empty folder some place.  Checkout the trunk folder from the repository you just created by specifying the file:///bla/bla/bla/trunk style URL:

05_checkout

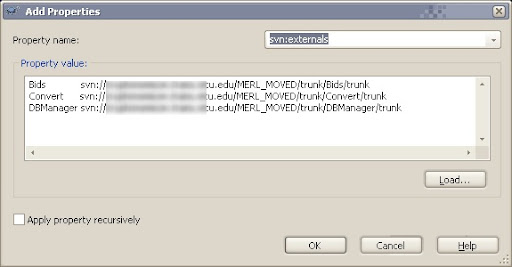
Now, specify the svn:external properties that will link your local repository's trunk folder to multiple remote repository folders. To do this, right-click on your working folder, and choose TortoiseSVN->Properties. In the dialog that pops up, click the 'Add' button. This will bring you to this dialog:
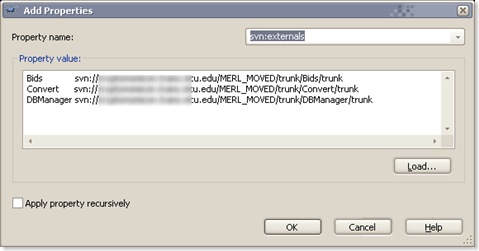
06_specify_externals

Choose 'svn:externals' From the Property name combo box. In the Property value text box, you will need to enter key/value pairs of the remote repositories.  The first item on the line is what you want folder to be named in your local repository.  The second item on the line is the full path to the remote repository.  (If you have credentials already cached for the remote repository, you shouldn't have a problem, otherwise you'll probably be asked to specify your username/password when you update later.)

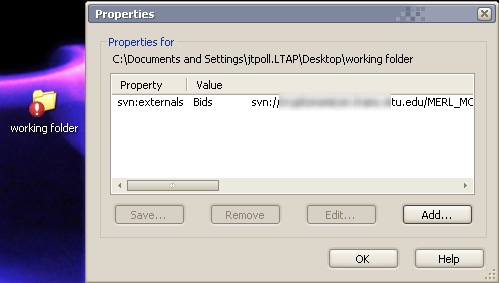
When you hit the "OK" button, you'll notice that your working folder has been changed:
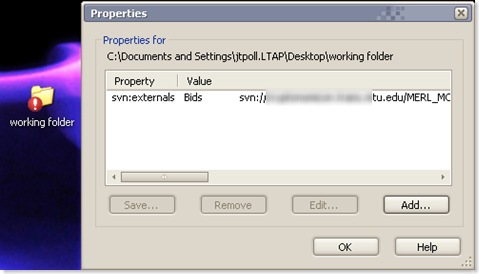
07_specify_externals2 

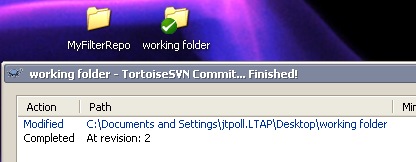
Now, commit your working folder back to your local repository.  Don't worry, the repository(ies) linked via the svn:externals property will not be modified at this time. 

08_externals_commited 

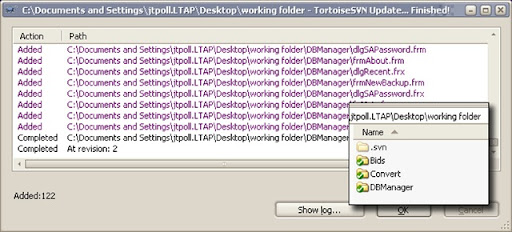
Now, update your working folder.  You'll notice that all of the repository locations mentioned in your svn:externals property will be checked out to your working folder.  Hooray!  You did it!
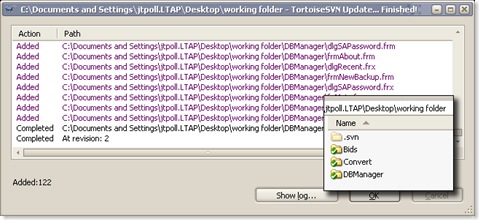
09_update_includes_externals

You are now able to work in the sections of the remote repository that you want to work on, while completely ignoring all the other cruft that you don't want to see or care about. When you commit any changes to this local repository, you'll be pushing those changes to the remote repository in a single atomic commit. 

(I must admit, I originally found this via tortoisesvn.net, but since it's been one of those issues that I've dealt with for so long, I decided I had to duplicated the work-around here. )

To further understand how this works, I must again point you to the section of the official SVN book that describes externals, and what they're really intended to be used for.

Let me know if this helps!


Update - Gotchas

Surprisingly, there are very few gotchas with this technique. Thankfully, the only ones I've discovered are easily worked-around.
So, you have multiple externals defined, and you've made changes to the various external 'parts', like so:
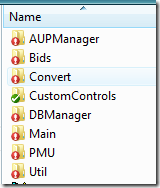
10_commit_multiple_externals

Normally, to commit those changes, you'd go to the parent folder, and choose to commit from there. The problem is, as you'll notice, is that TortoiseSVN will give you a message like:
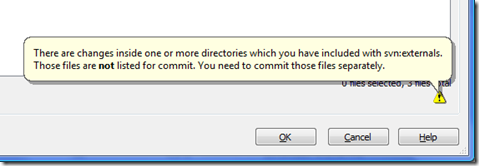
11_tortoise_notification

You'll also notice that the list of modified files doesn't include your changes. Notice how the message states that you'll have to commit those changes separately. If we'd RTFM'd like we were supposed to, we'd notice the paragraph near the bottom of Chapter 7, Section 3 of the SVN Book states: "So, for example, if you want to commit changes that you've made in one or more of those external working copies, you must run svn commit explicitly on those working copies—committing on the primary working copy will not recurse into any external ones."
This is exactly what we're trying to not do! Thankfully, there's a work-around which allows us to still create atomic commits across those externals:

  1. Go into the the working folder
  2. Select each folder that has modifications that you want to commit.
  3. Right-click -> SVN Commit
  4. TADA

Now, what we haven't ran into, but I imagine could theoretically happen is, what if one of those externally-included sources itself has external-definitions? For example, in the sample repository we've been using here, what if the DBManager had an external definition? If you made modification inside that nested external definition, there would be no way for you to commit the changes inside that nested external definition, and the changes in your home-spun externals repository.

Thursday, November 01, 2007

Dell / EMC AX150i/AX150SCi and Windows Server 2003 x64 iSCSI Initiator Woes

Can I have a much larger post name? 

In summary, this post details troubles I experienced by doing the right thing: I RTFM'd, and the manual was wrong.

I'm not sure how many people this post will help, but I know I'm writing it under the same guidelines I usually follow for posting: I had a hard time solving a problem, and the internet at large really didn't offer me much help, so, here we are.

At work we recently purchased a new server and storage-area-network (SAN) device:

  • Server: Dell 2950
    • Dual Intel Xeon 5320's (quad-core!) (1.86Ghz, 4MB cache, 1066MHz FSB) - 8 cores!
    • 16GB RAM
    • 6 160GB hard drives - RAID5'd via the integrate PERC 5/i RAID card. (I have some gripes about the PERC 5/i that I may describe in a later post.)
    • Dual integrated gigabit ethernet adapters.
  • SAN Device: Dell / EMC AX150i SP (ie: EMC AX150SCi)
    • iSCSI interface
    • Single storage processor (ie: "SP" in Dell-speak, "SCi" in EMC-speak)
    • 8 250GB HD's in a RAID-5 config (with space for 4-more drives, and the ability to swap-in 750GB drives!)
    • Separate 8-port Dell PowerConnect 2708 gigabit ethernet switch for the SAN network backbone / 'fabric'.

The 2950 is great, we're got it running Windows Server 2003 R2 Standard x64 Edition (this is important for later...) We have another 2950 in the office, and the only complaint I have with both of them is the server management software's inability to notify you, in any useful way, of RAID-failure events.  This is actually a problem with the integrated PERC 5/i card, but that's not what this post is about read Eric Neale's post about the PERC 5/i for more details on that gripe.

The SAN is pretty great too, except it's setup software is giving me problems, but before we get to that, a little more information on the configuration, and steps I took to get to the problem.

I'm going to be using the AX150 in a less-than-super redundant configuration.  I have the PowerConnect 2708 switch configured to be the primary switch for a private network that is used only for this storage-area-network.  The 2950 does not have an iSCSI host bus adapter (HBA), it's going to connect to the SAN with it's secondary NIC. Installing the necessary software on the Windows side of this was very easy.  Getting that software configured to work with the AX150 wasn't so.

I've followed EMC's instructions to-a-'T', which pretty much proceed as:

  • Install the Microsoft iSCSI Initiator software
  • Install the latest EMC PowerPath software
  • Install the latest EMC Navisphere Server Utility
  • Install the latest EMC Navisphere Initialization Utility
  • ...then follow the configuration steps.

I downloaded and installed v2.0.5 of the MS Software Initiator - followed EMC's specification that I install the 'Initiator Server' and the 'Software Initiator' - but not the 'MPIO Multipathing  Support for iSCSI.' This gave me an icon in my control panel and on my desktop.  EMC's documentation didn't state anything about configuring it at this point, so I left it alone. (yeah, that's foreshadowing.)

I then downloaded and installed EMC's PowerPath v5.1.0 from their registration-only support site.  This required a reboot to finalize installation.

Next up I downloaded and installed  v6.20.4.2.0 of the Navisphere AX Server Utility. This is where I ran into a couple separate issues.  In the box of the AX150 there was a big-poster-style "Getting Started" guide that came with the AX150.  At the point where it says to install the Server Utility it states to install with the defaults, and to make sure that the 'Registration Server' is installed - which it states is the default.  But, it was disabled by default when I ran the installer.  The documentation I retrieved directly from EMC's web site stated that I should explicitly not install the 'Registration Service'.  Okaaaaaay. So, which is correct? First time through, I choose not to install it because I figured the online documentation was more recent/up-to-date. The second snag in this installation started when it asked me:

"Are you installing this utility on a server that is using the Microsoft iSCSI initiator to connect to the CLARiiON storage system?"

Neither the 'big-poster' or the online documentation stated what I should choose, so, since it sounded appropriate, I choose 'Yes'. It then presented this message/error:

"Microsoft Initiator is needed to setup your iSCSI devices. InstallShield does not find Microsoft Initiator installed on your computer. Please download Microsoft Initiator from www.microsoft.com and install it."

Whaaaaaaaat?  I had already installed MS iSCSI Initiator!  Strangely though, the installation didn't abort, and continued on to completion with no other errors or strange messages.

After this, I download and installed v6.20.0.3.11 of the Navisphere Initialization Tool. After this is installed, I was instructed to use it to initialize the AX150. The initialization process assigns IP addresses to the management interface and iSCSI ports on the unit. 

After initialization, I was instructed to open the Server Utility and choose the "Configure iSCSI Connections on this server" option. Well, look at the screenshot below and you tell me what I should choose:

emc_server_utility 

Yup.  There's my problem summed up in a screenshot.  Figuring I had missed something, or done something wrong, I meticulously combed through my installation notes, and cross-referenced the installation documentation. I tried rolling back installations and re-installing with different options. (Specifically, I tried installing the 'Registration Service', and I also tried answering 'no' to the Server Utilities install question mentioned earlier.)  No combination of installation options made a difference. I spelunked through more documentation on EMC's support site.  I looked on Dell's site for documentation -- they kept pointing me to EMC's support site.  I tried Google for answers - I found nothing. 

I finally decided I'd have to get in touch with Dell.  I went to their support page, got to their 'online chat support' area, entered the AX150's service-tag, and, tada, found that everyone was busy with someone else.  (It's nice to see chat-support is no-more available than phone support.)  I tried a couple times, hoping to get through.  Nothing.  I really didn't want to email them because I needed to get this system online, and who knows how many days turn-around it would take to get resolved via email. 

I started looking for the correct phone number to call, and I somehow, probably because I'd entered the AX150's service tag, I found myself at a tech-support page specific to the AX150.  There's a section near the top: "Top Solutions : Frequently Asked Questions About Your Model":

  1. What is RAID 0 and RAID 1
  2. What is RAID 5
  3. How can I collect the SP event logs from a CLARiiON FC4700 or CS-Series array using the serial port?
  4. How do I configure the LUNs on my DELL|EMC® array?
  5. EMC® Navisphere® Server Utility iSCSI configuration is not available in Microsoft® Windows® 2003 64-bit

(Side question: What's with questions #1 and #2?  "You must be at least this smart to ride this ride." comes to mind. hehe.)

Number five!  Look at that!  That's exactly my problem! Dell's documentation had the answer, not EMC's!  Dell keeps redirecting you to EMC's documentation when they had the answer to my question all along. 

It's a bummer that I had to spend this much time finding this answer because getting things configured manually through the MS iSCSI Initiator is really quite simple.

Oh well...live-n-learn.

Sunday, October 28, 2007

Getting Breakpoints to work in Eclipse PDT using Zend Debugger

November 18th, 2007 UPDATE: Please see the section at the bottom of this post for an update!

I've recently been fooling around with PHP.

At work we have a Drupal-based web site, and I figured it was time to get a better mental-grasp around PHP. After looking through a whitepaper from IBM titled Using open source software to design, develop, and deploy a collaborative Web site I decided I needed to get myself a development environment setup in which I could work with Drupal 'under-the-hood'.

IBM's whitepaper was written in various pieces over the course of about a years time. One of the sections discusses setting up Eclipse with different plugins that facilitate PHP development. In a later section they mention the PHP Development Tools (PDT) - a more comprehensive set of PHP development and debugging tools for Eclipse. Lucky for me, they now have a PDT all-in-one Eclipse package that makes setup even easier. (Get the package from here.) After downloading and installing it, and getting a feel for the whole thing (wow, Eclipse is complicated at first,) I got down to the brass-tacks and tried debugging.

Before I go on, here's a little more information about my development environment:
  • OS: Window XP SP2
  • Development Environment:
    • Eclipse : PDT
    • PHP 5.2.4
    • MySQL 5.Something
  • Web server: Apache
PHP, MySQL and Apache are all from the Apache Friend's XAMPP package.

I followed the instructions on the PDT Wiki for instructions on how to Install the Zend Debugger for Eclipse.


Just for reference, in the screenshot above, you'll notice my "Dummy Debugger Test Server" configuration. Here's a screenshot of the specific details of that config:


After getting everything setup, I could get the debugger to debug any PHP-based web page -- so long as I had the "Break at First Line" debugging option set. I could start the debugger and at the first line of PHP code, the debugger would 'catch', and allow me to step through my code. Everything worked as expected - variables and their values were visible in the Variables dialog, I could step into and out of various functions. Unfortunately, if I set breakpoints anywhere, they would never 'hit', the debugger wouldn't halt the PHP execution on the specified breakpoints. It would zip right past them as though they never existed.

Naturally I hit-up my good friend Google for answers. I found a number of people having the same problem as myself. I found instances of people having this problem all the way back in January of 2007. I also found instances of people having this problem as recently as October of 2007! Every single time I found someone saying they had the problem, nobody ever had an answer for them!

Finally, finally, I was able to find this somewhat cryptic post on how someone fixed the problem:


Not sure if this helps, but I ran into the same problem myself. I found out that it was that the plugin expects the project root to be the http root.

My project structure had the http root as a subfolder of the project root.

If the http root isn't the same point as the project root, then the plugin can't correctly inform the debugger which file the breakpoint is in.

I ended up hacking the source to make the plugin work at a subfolder level.


Problem was, he stated that he hacked the source of the plugin to 'make the fix'. Not exactly what I was hoping to do. I figured I was approaching yet another dead end, but something about him stating that the plugin was simply confused about expecting your Eclipse project's root to be the web server's root gave me an idea: Move my content to the virtual host's root directory.

I tried moving my project's files all into the root folder of the web server (just dummy.php in this case.) I modified my "Dummy Debugger Test Server" configuration as shown in this screenshot:


I made sure that "Break at First Line" was unchecked/disabled, and fire up the debugger. It worked. It finally worked. After all that trouble it freakin' worked.


Has anyone else had this much trouble? Has anyone been able to get debugging to work when your debugged PHP doesn't reside in the root of your web server?

November 18th, 2007 Update:
I think I may have a better example. I've also been 'playing' around with the Symfony PHP Framework. I again ran into this breakpoints-not-working problem when trying to debug a Symfony-based project.

I'm going through the "Askeet" tutorial and have imported a project into Eclipse and had my Apache instance serving up the "/web" subfolder served up as the server's document root.

Of course, this confuses the debugger plugin, because, again, the debugger is assuming that the Eclipse project-root corresponds directly to the web server's root directory, which it's not. This is the situation:


The arrow titled "Assumed" is what the debugger is wrongly assuming. To fix the problem, you have to configure your web server to match that assumption.

So, I modified the virtual host's DocumentRoot to point to the Askeet project's root folder, even though there is no index.html or index.php to be served from there. I had to also modify the "/sf" alias to handle "/web/sf". (If you're using Symfony, you should know what I'm talking about.) So, now instead of going to http://localhost, I have to go to http://localhost/web/. But since this is strictly for development purposes, it's not a big deal. Oh, and I had to make a slight modification to the debugging profile in Eclipse to match the new /web/index.php URL. Again, not a big deal.

I hope this update cleared any confusion...

Thursday, September 27, 2007

TortoiseSVN's "Noisy" TSVNCache.exe

A co-worker of mine pointed me to a post by Travis Illig on his blog titled "Optimize Tortoise SVN Cache (TSVNCache.exe) Disk I/O"

A short synopsis:


TortoiseSVN has a shell-overlay that indicates the status of your files and folders within an SVN 'working folder'.

The background process that 'watches' your file system for SVN-related files and folders is TSVNCache.exe.

TSVNCache.exe, according to Travis, was bogging his system down with disk I/O.

Instead of disabling TSVNCache.exe entirely (and thereby disabling the icon-overlays) he found a way to limit what TSVNCache.exe 'watches' on the file system.


When I first read his post, I thought "How bad can TSVNCache.exe be?" So, as noted in the comments of Travis' post, I grabbed FileMon from SysInternals, and fired it up. After setting a filter so it would only display TSVNCache.exe-related events, I was amazed at just how much 'noise' it was causing -- and I wasn't doing anything at all! Just sitting there watching FileMon do it's thing.

What really caught my eye was when I sent my coworker an instant message, thanking him for the link. My IM client wrote the message to it's log file, and I saw TSVNCache note the change, and check the log file's location for the existence of a ".svn" folder. (The existence of such a folder would indicate that the folder is an SVN working folder.)

I was surprised to say the least, and wanted to see how bad it really got. I 'putzed ' around doing a whole lot of nothing other than navigating around my file system. I seemed ridiculous at just how much disk I/O TSVNCache.exe was inducing.

For example, look at the following screen shot. It's the TSVNCache activity imposed when I copied a folder on my desktop, which contains one file:


Thankfully, by limiting which folders TSVNCache.exe 'watches' you can greatly limit this superfluous disk I/O. In case you still haven't taken a moment to click-through and read Travis' post, here's the quick run-down:


  1. Open your TortoiseSVN settings (Right-click the desktop, TortoiseSVN -> Settings)

  2. Go to the "Icon Overlays" item in the treeview.

  3. Add "C:\*" to the "Exclude Paths" box

  4. Add the folders you do want included in the "Include Paths" box
    • I entered my 'work' folder: "C:\Work\*", for example.

  5. Save changes : Apply/Ok

  6. Restart TSVNCache.exe - kill TSVNCache.exe in your Task Manager. It will automatically restart when you open a Windows Explorer.


With these changes in place, within FileMon, you'll notice that TSVNCache is a lot less noisy. It will still receive "Change Notify" messages, but you won't see it access files/folders outside of your specified "Include" list.


Thanks for the great tip, Travis!