Wednesday, November 14, 2007

Cloaking/Hiding/Filtering Unwanted Directories During Checkout (aka "Partial Checkouts") With Subversion 1.4.x

The Problem:

Ever find yourself working with a large-ish SVN repository that includes many sub-projects, and you only want to work on a subset of those sub-projects, but you don't want to deal with all the extra cruft involved in checking out at the top level of the repository?

"What's this guy talking about?"

Sorry, a picture will help me explain.  Below is a snapshot of an old repository of one of products we develop here at work:

00_source_repo_browse

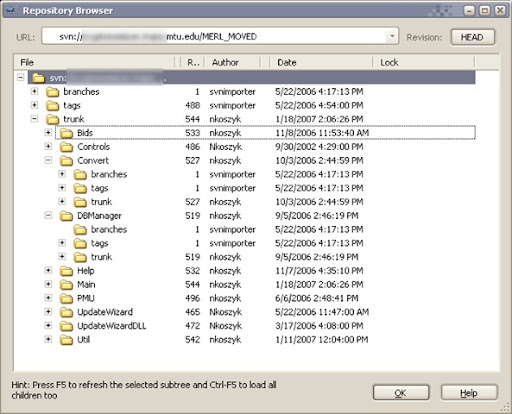
As you can see, trunk consists of multiple sub-components, each of which have their own branches/tags/trunk folders.  Whether or not this is the best repository layout could be up for debate, but it seems to treat us well with the design of this project. (We have a repository layout similar to this for another project we have, and it seems to serve us well there as well.)

The big problem we have with this repository layout is that you never want to checkout that top-level trunk.  You end up with all of the sub-branches and tags folders that are not only superfluous, but also waste space and make the commit or update process so much slower because SVN must check all the sub-folders for modifications.

What ends up happening, for example, is someone needs to work on the "Bids" and "Main" components at the same time.  To facilitate this without checking out at the trunk-level is they create two separate working folders, and check out each respective component's trunk (or appropriate branch).  When they commit, they have to make two separate commits.

While this works, it's not desirable, especially if you aspire to reach Continuous Integration nirvana. Not being able to create an atomic commit across various working folders could potentially break things in a CI environment if changes in one component rely upon the changes of another.  Even if CI isn't your eventual goal, an atomic commit of 'grouped changes' just makes sense.

"What to do?" 

The Fix:

Well, the good news is that Subversion 1.5 is supposed to have better support for 'partial checkouts'.  I'll admit I haven't kept up with that aspect of v1.5, to be totally honest, I'm more excited about merge tracking. But that's for another post.

But anyway, there is a work-around in SVN 1.4.x (and probably earlier versions..sorry for not doing any fact-checking here.)  Well, maybe work-around isn't the right word, it's more of an off-label use of a repository feature.

Before continuing on, you must know that I'm primarily a Windows developer.  I use Subversion on Windows via the excellent TortoiseSVN front end. The following how-to is going to be using TortoiseSVN.  Everything that follows is entirely possible with the command line SVN tools, and, if there's enough request, I'll update this post with how to do it from the command line. (email me!)

"Get to it already, would ya?"

Sorry, here we go, in short:

  1. Create a repository on your local machine.
  2. Checkout a working copy of the repository and specify an svn:external property that will link to the portions of the remote repository you really want to work with. (Read the SVN Book for important notes and details.)
  3. Commit this svn:externals property back to the local repository.
  4. Update you working copy of the local repository and you'll have checked out the parts of the remote repository you want to work with.

Details:

Create a new folder somewhere on your machine, make sure it's in a place that you won't forget, and in non-obtrusive location because once this is created, it can't be moved without causing you pain in the process. ;)

01_myfilterrepo

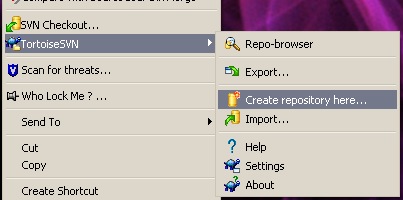
MyFilterRepo is a folder on my desktop.  Now, using TortoiseSVN, create an empty repository inside that new folder.  Right click on the folder, choose  TortoiseSVN -> Create repository here...  Choose the 'FSFS' file system type.

02_create_repo 

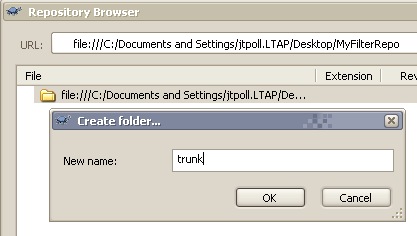
Then, browse this repository, right-click the folder, TortoiseSVN->Repo-browser:

03_repo_browse

Create a 'trunk' folder (or any other folder...it doesn't really matter:)

04_create_trunk

Create another empty folder some place.  Checkout the trunk folder from the repository you just created by specifying the file:///bla/bla/bla/trunk style URL:

05_checkout

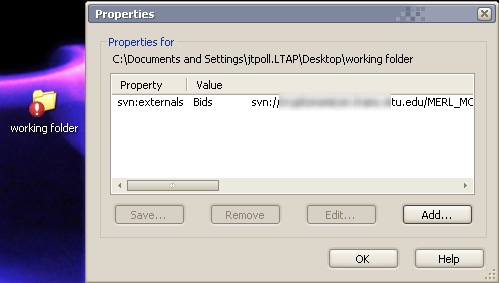
Now, specify the svn:external properties that will link your local repository's trunk folder to multiple remote repository folders. To do this, right-click on your working folder, and choose TortoiseSVN->Properties. In the dialog that pops up, click the 'Add' button. This will bring you to this dialog:

06_specify_externals

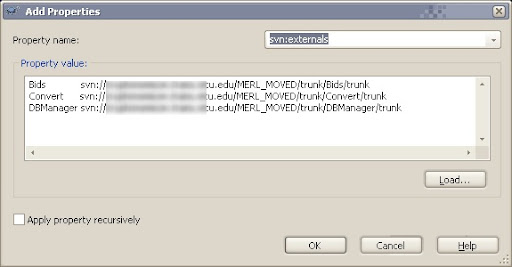
Choose 'svn:externals' From the Property name combo box. In the Property value text box, you will need to enter key/value pairs of the remote repositories.  The first item on the line is what you want folder to be named in your local repository.  The second item on the line is the full path to the remote repository.  (If you have credentials already cached for the remote repository, you shouldn't have a problem, otherwise you'll probably be asked to specify your username/password when you update later.)

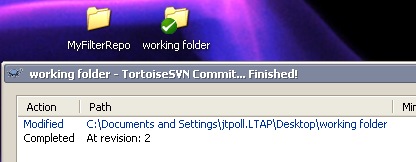
When you hit the "OK" button, you'll notice that your working folder has been changed:

07_specify_externals2 

Now, commit your working folder back to your local repository.  Don't worry, the repository(ies) linked via the svn:externals property will not be modified at this time. 

08_externals_commited 

Now, update your working folder.  You'll notice that all of the repository locations mentioned in your svn:externals property will be checked out to your working folder.  Hooray!  You did it!

09_update_includes_externals

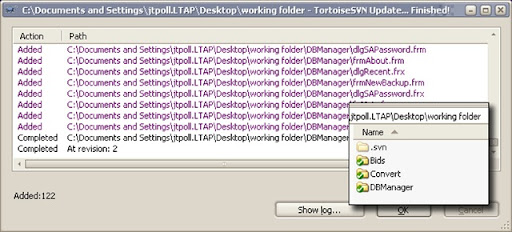
You are now able to work in the sections of the remote repository that you want to work on, while completely ignoring all the other cruft that you don't want to see or care about. When you commit any changes to this local repository, you'll be pushing those changes to the remote repository in a single atomic commit. 

(I must admit, I originally found this via tortoisesvn.net, but since it's been one of those issues that I've dealt with for so long, I decided I had to duplicated the work-around here. )

To further understand how this works, I must again point you to the section of the official SVN book that describes externals, and what they're really intended to be used for.

Let me know if this helps!


Update - Gotchas

Surprisingly, there are very few gotchas with this technique. Thankfully, the only ones I've discovered are easily worked-around.
So, you have multiple externals defined, and you've made changes to the various external 'parts', like so:

10_commit_multiple_externals

Normally, to commit those changes, you'd go to the parent folder, and choose to commit from there. The problem is, as you'll notice, is that TortoiseSVN will give you a message like:

11_tortoise_notification

You'll also notice that the list of modified files doesn't include your changes. Notice how the message states that you'll have to commit those changes separately. If we'd RTFM'd like we were supposed to, we'd notice the paragraph near the bottom of Chapter 7, Section 3 of the SVN Book states: "So, for example, if you want to commit changes that you've made in one or more of those external working copies, you must run svn commit explicitly on those working copies—committing on the primary working copy will not recurse into any external ones."
This is exactly what we're trying to not do! Thankfully, there's a work-around which allows us to still create atomic commits across those externals:

  1. Go into the the working folder
  2. Select each folder that has modifications that you want to commit.
  3. Right-click -> SVN Commit
  4. TADA

Now, what we haven't ran into, but I imagine could theoretically happen is, what if one of those externally-included sources itself has external-definitions? For example, in the sample repository we've been using here, what if the DBManager had an external definition? If you made modification inside that nested external definition, there would be no way for you to commit the changes inside that nested external definition, and the changes in your home-spun externals repository.

Thursday, November 01, 2007

Dell / EMC AX150i/AX150SCi and Windows Server 2003 x64 iSCSI Initiator Woes

Can I have a much larger post name? 

In summary, this post details troubles I experienced by doing the right thing: I RTFM'd, and the manual was wrong.

I'm not sure how many people this post will help, but I know I'm writing it under the same guidelines I usually follow for posting: I had a hard time solving a problem, and the internet at large really didn't offer me much help, so, here we are.

At work we recently purchased a new server and storage-area-network (SAN) device:

  • Server: Dell 2950
    • Dual Intel Xeon 5320's (quad-core!) (1.86Ghz, 4MB cache, 1066MHz FSB) - 8 cores!
    • 16GB RAM
    • 6 160GB hard drives - RAID5'd via the integrate PERC 5/i RAID card. (I have some gripes about the PERC 5/i that I may describe in a later post.)
    • Dual integrated gigabit ethernet adapters.
  • SAN Device: Dell / EMC AX150i SP (ie: EMC AX150SCi)
    • iSCSI interface
    • Single storage processor (ie: "SP" in Dell-speak, "SCi" in EMC-speak)
    • 8 250GB HD's in a RAID-5 config (with space for 4-more drives, and the ability to swap-in 750GB drives!)
    • Separate 8-port Dell PowerConnect 2708 gigabit ethernet switch for the SAN network backbone / 'fabric'.

The 2950 is great, we're got it running Windows Server 2003 R2 Standard x64 Edition (this is important for later...) We have another 2950 in the office, and the only complaint I have with both of them is the server management software's inability to notify you, in any useful way, of RAID-failure events.  This is actually a problem with the integrated PERC 5/i card, but that's not what this post is about read Eric Neale's post about the PERC 5/i for more details on that gripe.

The SAN is pretty great too, except it's setup software is giving me problems, but before we get to that, a little more information on the configuration, and steps I took to get to the problem.

I'm going to be using the AX150 in a less-than-super redundant configuration.  I have the PowerConnect 2708 switch configured to be the primary switch for a private network that is used only for this storage-area-network.  The 2950 does not have an iSCSI host bus adapter (HBA), it's going to connect to the SAN with it's secondary NIC. Installing the necessary software on the Windows side of this was very easy.  Getting that software configured to work with the AX150 wasn't so.

I've followed EMC's instructions to-a-'T', which pretty much proceed as:

  • Install the Microsoft iSCSI Initiator software
  • Install the latest EMC PowerPath software
  • Install the latest EMC Navisphere Server Utility
  • Install the latest EMC Navisphere Initialization Utility
  • ...then follow the configuration steps.

I downloaded and installed v2.0.5 of the MS Software Initiator - followed EMC's specification that I install the 'Initiator Server' and the 'Software Initiator' - but not the 'MPIO Multipathing  Support for iSCSI.' This gave me an icon in my control panel and on my desktop.  EMC's documentation didn't state anything about configuring it at this point, so I left it alone. (yeah, that's foreshadowing.)

I then downloaded and installed EMC's PowerPath v5.1.0 from their registration-only support site.  This required a reboot to finalize installation.

Next up I downloaded and installed  v6.20.4.2.0 of the Navisphere AX Server Utility. This is where I ran into a couple separate issues.  In the box of the AX150 there was a big-poster-style "Getting Started" guide that came with the AX150.  At the point where it says to install the Server Utility it states to install with the defaults, and to make sure that the 'Registration Server' is installed - which it states is the default.  But, it was disabled by default when I ran the installer.  The documentation I retrieved directly from EMC's web site stated that I should explicitly not install the 'Registration Service'.  Okaaaaaay. So, which is correct? First time through, I choose not to install it because I figured the online documentation was more recent/up-to-date. The second snag in this installation started when it asked me:

"Are you installing this utility on a server that is using the Microsoft iSCSI initiator to connect to the CLARiiON storage system?"

Neither the 'big-poster' or the online documentation stated what I should choose, so, since it sounded appropriate, I choose 'Yes'. It then presented this message/error:

"Microsoft Initiator is needed to setup your iSCSI devices. InstallShield does not find Microsoft Initiator installed on your computer. Please download Microsoft Initiator from www.microsoft.com and install it."

Whaaaaaaaat?  I had already installed MS iSCSI Initiator!  Strangely though, the installation didn't abort, and continued on to completion with no other errors or strange messages.

After this, I download and installed v6.20.0.3.11 of the Navisphere Initialization Tool. After this is installed, I was instructed to use it to initialize the AX150. The initialization process assigns IP addresses to the management interface and iSCSI ports on the unit. 

After initialization, I was instructed to open the Server Utility and choose the "Configure iSCSI Connections on this server" option. Well, look at the screenshot below and you tell me what I should choose:

emc_server_utility 

Yup.  There's my problem summed up in a screenshot.  Figuring I had missed something, or done something wrong, I meticulously combed through my installation notes, and cross-referenced the installation documentation. I tried rolling back installations and re-installing with different options. (Specifically, I tried installing the 'Registration Service', and I also tried answering 'no' to the Server Utilities install question mentioned earlier.)  No combination of installation options made a difference. I spelunked through more documentation on EMC's support site.  I looked on Dell's site for documentation -- they kept pointing me to EMC's support site.  I tried Google for answers - I found nothing. 

I finally decided I'd have to get in touch with Dell.  I went to their support page, got to their 'online chat support' area, entered the AX150's service-tag, and, tada, found that everyone was busy with someone else.  (It's nice to see chat-support is no-more available than phone support.)  I tried a couple times, hoping to get through.  Nothing.  I really didn't want to email them because I needed to get this system online, and who knows how many days turn-around it would take to get resolved via email. 

I started looking for the correct phone number to call, and I somehow, probably because I'd entered the AX150's service tag, I found myself at a tech-support page specific to the AX150.  There's a section near the top: "Top Solutions : Frequently Asked Questions About Your Model":

  1. What is RAID 0 and RAID 1
  2. What is RAID 5
  3. How can I collect the SP event logs from a CLARiiON FC4700 or CS-Series array using the serial port?
  4. How do I configure the LUNs on my DELL|EMC® array?
  5. EMC® Navisphere® Server Utility iSCSI configuration is not available in Microsoft® Windows® 2003 64-bit

(Side question: What's with questions #1 and #2?  "You must be at least this smart to ride this ride." comes to mind. hehe.)

Number five!  Look at that!  That's exactly my problem! Dell's documentation had the answer, not EMC's!  Dell keeps redirecting you to EMC's documentation when they had the answer to my question all along. 

It's a bummer that I had to spend this much time finding this answer because getting things configured manually through the MS iSCSI Initiator is really quite simple.

Oh well...live-n-learn.